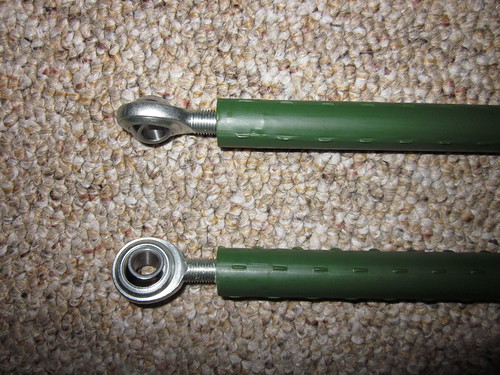
Threading the rod ends into the pole ends.
I got the kids sled from Any Mountain in Berkeley. They had 3 and 5 foot sleds, so I bought the 5 foot sled for $14.99. It is made from pretty beefy plastic. It needs to be because a lot of holes have to be drilled into the sled, to attach the poles and grommets for rope. Once I got the sled, I drove to OSH (a hardware store) to get the rigid poles and other hardware. The garden section had all kinds of long rigid poles. I at first wanted solid fiberglass poles, which was recommended in Ed's pdf designs, but when I saw them at OSH, they were very heavy. They only had 1 inch diameter pole that was 5 or 7 feet long. 5 feet was too short, and 7 feet was really getting heavy. They also had plastic green poles which I think have a little bit of steel reinforcement. They were really light and not too flexible (you don't want them to snap under the load of the sled when you go downhill), so I got the 7 foot long green plastic poles. I hope they work! We shall see next week!
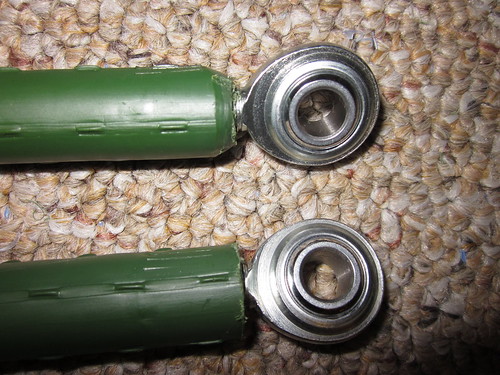
The rod ends are fully threaded in and ready to be attached to the sled and waist belt.
Then I moved on to the part of the store where they sell hardware. To attach the poles to the sled, I liked Ed's design of using a threaded rod end which has a bearing inside of it so that anything put through it can pivot slightly. The rod ends slips through a locking small hitch pin thingy. According to Ed's design, the hitch pin is then put into aluminum channel stock that is cut into a two inch piece. I looked all over and even asked the store manager at OSH, but they had no channel stock. But Romy came up with an ingenious idea. Caster wheels!!!
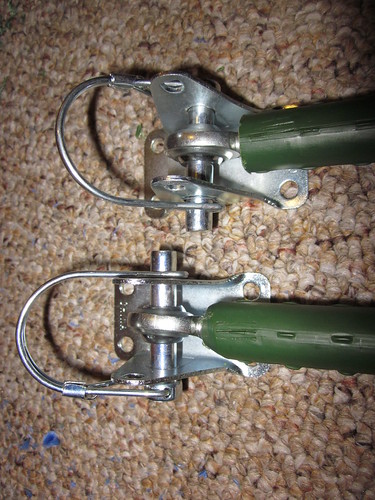
The rod ends attach to a lock hitch pin, which is slipped into a caster wheel frame (without the caster wheel).
Basically, you take a caster wheel, and pull the wheel off, and you're left with just the frame which is like a small piece of channel stock, but better, because it already has a mounting system. We had to drill out the holes to be a bit bigger, to fit the thick locking pin. Then, this whole assembly gets bolted to the sled by drilling four holes into the sled near the front on each side.
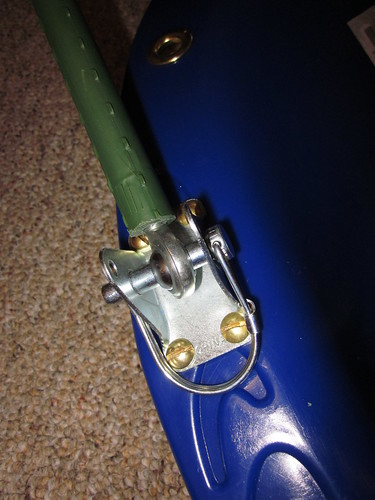
The whole assembly is bolted onto each side of the sled, towards the front. The poles can pivot a little.
The beauty of this type of system is that the poles can be removed from the sled by just slipping off the locking pin, but the pin is very stable while it is locked in place. The other ends of the poles are tied onto the waist belt. We have a couple hiking backpacks, and one of them has a removable waist belt, so we are using that one for the pulk.
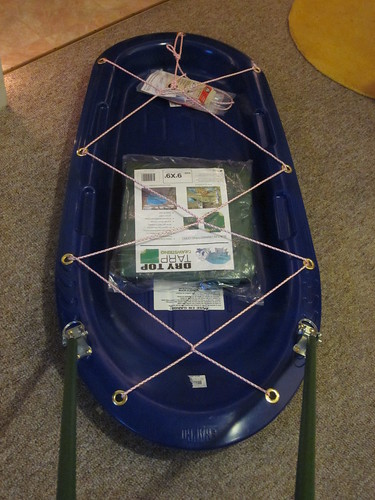
I put some grommets along the edges of the sled so that rope can be strung through to secure the cargo.
Finally, to secure the cargo on the sled, I put some of the left over grommets I had from making my yurt along the sides of the sled. Once they were all punched in, I strung rope through it like a net. All we have to do it wrap our stuff in a tarp, place it in the sled, and tighten the rope. Then it should be all set to go! We'll be using it on our trip next week in Wyoming, where we'll be skiing to a back country cabin we rented from the Medicine Bow National Forest.
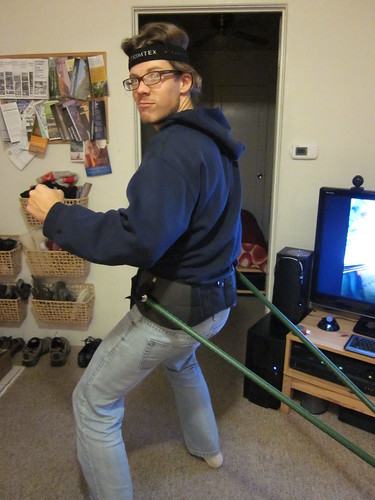
Romy demonstrates how the hip belt is worn, where the other end of the rigid poles attach.
----- UPDATE 1/31/2011 -----
We returned from our winter trip with the ski pulk a few weeks ago now. I've gotta say that I was 90% satisfied with how the pulk turned out! The poles were excellent. They did not break or flex, and they were so lightweight. The sled was sturdy and strong, and did not break even in sub-zero temperatures. However, the way we mounted the poles to the hip belt needs to be re-done. What we did was tie the hip belt to the poles by literally tying a knot. This ended up getting lose after a while, and the ski pulk went side to side with each stride. It also jerked on the hip belt when taking longer strides. This is in no way a fault of the design we followed, since the way to attach the hip belt varies depending on what hip belt you use. I will be 100% satisfied once we tie the hip belt to the poles more solidly, so there is no play. Here are some pictures of the pulk in action:

Using the pulk to carry our camping equipment in Craters of the Moon National Monument, Idaho.

We loaded the pulk a lot on this trip to a remote national forest cabin in Idaho, and it was a very smooth trip!

10 comments:
I am copying your pull design. But I am stymied by the plastic poles. What kind of poles are these and what are they used for? I have some 3/4 inch PVC but it is hard to attach in a simple way.
Richard Swanson
Bozeman
Richard - The poles were from a large local hardware store (OSH) from the garden section. I believe they are normally meant for gardening. What I mean by that is, they are to be used as large stakes to secure plants or trellises. They are basically a steel hollow light-weight tube which is coated by a greenish layer of plastic. The ends of the tube are filled with a plug of more greenish plastic, which is how I was able to thread in the rod ends. I found them to be the perfect balance between rigidity and strength. The solid fiberglass tubes were too heavy and stuff. If you have pvc pipe, you might want to figure out a way to plug up the ends with something solid that you can them drill into.
Good luck on your project!
Love the design...curious if you have an update on how those poles held up?
I have gone through many blogs but yours puts a great knowledge inside and I completely satisfied with it, hoping more Information like this. Well, meanwhile I would like to share about stainless steel threaded rod. You can also visit Siddhagiri Metals & Tubes for more related information.
This post is gives very useful tips for us which is effective our thoughts. Define step by step process that easily understand by us duplex tube suppliers If you wants more related services then must visit Perfect Impex.
Keep sharing these types of information, that All suggestions in your blog is helpful for us. If anyone search related best services carbon steel pipe suppliers then must visit Kanak Metal & Alloys.
Thanks for shared that blog with us. If anyone here searching Stainless Steel 316 flanges then visit Regal Sales Corporation.
Thanks for such a pleasant post. This post loaded with lots of useful information. Keep it up. If you are looking for the best information and suggestions related to Grade 8.8 bolts then visit Jignesh Steel.
You can also use a standard USB cable to move your phone numbers from your phone to your computer. This is quick and ensures you have a copy of your contacts if something goes wrong. IP Filtering SIM Card
Hi,
Funnily enough I found the same type of poles that you used in a garden centre where I live in Dublin, Ireland.
The problem I have is attaching the pole ends. How did you do it exactly - did you find a way to thread them in, or did you use glue? The metal pole ends I have found are slightly narrower than the poles, so they would be loose unless I used epoxy to glue them, and I don't think I would trust that to hold.
Post a Comment